

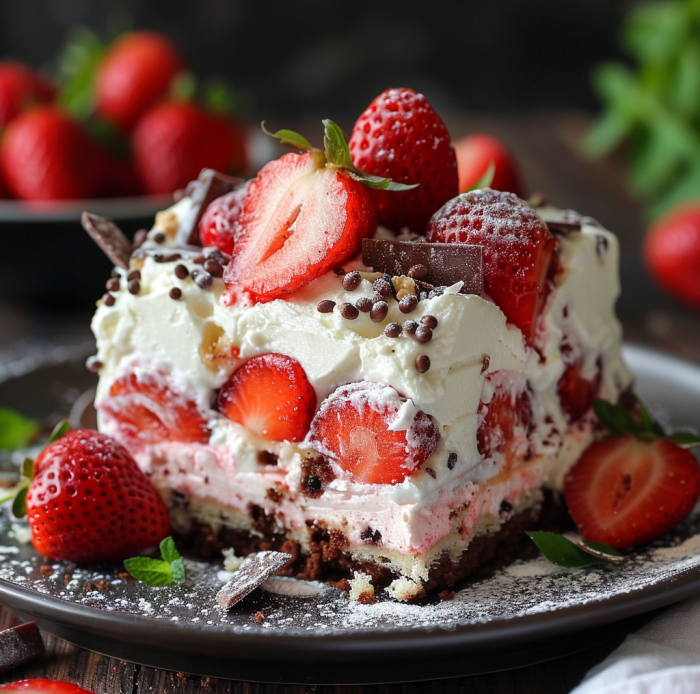
Imagine a cake so bold, it shakes up tradition with every slice. The strawberry earthquake cake is more than a dessert—it’s an event. Its cracked, layered design looks like an earthquake, while the creamy tang of cream cheese and fresh strawberries create a flavor explosion.
Whether you’re celebrating a milestone or just want a weekend treat, this recipe is an adventure. You start with a white cake mix, making it easy to master this showstopping dessert.
In this guide, you’ll learn secrets to get the cake’s signature “earthquake” texture. You’ll also learn how to balance sweet and tangy layers. Plus, you can adapt the strawberry earthquake cake with white cake mix to your liking. Every step is simple, so your creation will impress without stress. Let’s make your kitchen a bakery—no experience needed.
Key Takeaways
- Discover how the cake’s cracked design and vibrant layers make it unforgettable.
- Learn to use white cake mix for a light base that contrasts with bold strawberry flavors.
- Follow precise steps to layer cream cheese filling and avoid common mistakes.
- Customize the recipe with fresh or frozen strawberries and optional additions.
- Store and serve tips to keep the cake fresh and visually stunning.
What Is a Strawberry Earthquake Cake?
Explore the fascinating tale of the strawberry earthquake cake and its twin, the strawberry seismic cake. These desserts are more than just sweet treats—they’re a sensation in the culinary world. Find out how they started, why they break the mold, and why they look and feel so unique.
The Origin of Earthquake Cakes
Earthquake cakes originated in Southern U.S. kitchens as decadent chocolate delights. Bakers then experimented with fruit, introducing the vibrant strawberry earthquake cake. This evolution transformed a classic into a daring, contemporary dessert that fuses tradition with creativity.
Why It’s Called an “Earthquake” Cake
The cake’s layers dramatically shift during baking. Cream cheese and batter separate, creating cracks that mimic the earth’s movements. This “seismic” phenomenon earns it the “earthquake” moniker and the nickname strawberry seismic cake. The outcome? A dessert that’s as lively as it is delicious.
How It Differs from Traditional Strawberry Cake
Here’s what makes it special:
- Texture: Cream cheese pockets and airy batter layers contrast sharply with smooth, uniform traditional cakes.
- Appearance: Marbled cracks and uneven layers create a rustic, “earthquake” aesthetic, unlike neatly frosted designs.
- Flavor: Tangy cream cheese balances strawberry sweetness, offering a complex taste profile traditional cakes lack.
Essential Ingredients for Your Strawberry Earthquake Cake
Making a strawberry earthquake cake with white cake mix begins with the right stuff. Start with a classic white cake mix for a light base. This lets the strawberry flavors pop. Add fresh or frozen strawberries—thawed and drained—to add juicy sweetness.
Cream cheese and softened butter make a creamy center. Powdered sugar and vanilla extract balance the taste.
- White cake mix: Choose a quality mix for consistent results.
- Strawberries: Use 2 cups—frozen work well if fresh aren’t in season.
- Cream cheese and butter: Room temperature versions mix smoother.
- Powdered sugar: Adjust sweetness to taste.
- Vanilla extract: Enhances natural flavors without overpowering.
Adding white chocolate chips or strawberry extract can deepen the flavor. For what to make with strawberry cake mix, try using strawberry mix instead of white. But remember, it’s sweeter. You can also use dairy-free butter or vegan cream cheese for special diets.

“A great earthquake cake isn’t just layers—it’s about how each ingredient works together.”
Quality is key: Use ripe strawberries for sweetness. Don’t overmix to keep it light. These steps create the “earthquake” ripple effect when you slice it. Each ingredient is important, so measure carefully and experiment wisely.
Kitchen Tools You’ll Need
Creating a strawberry earthquake cake requires the right tools. These tools help keep your layers together and make sure the flavors pop. You can use a boxed mix or make your ingredients from scratch.
Must-Have Equipment
- 9×13-inch baking pan: The standard size for a strawberry cheesecake with cake mix base
- Mixing bowls (two sizes for dry/wet ingredients)
- Electric mixer (critical for creaming cream cheese smoothly)
- Measuring cups and spoons (stainless steel or glass for accuracy)
Optional Tools That Make Baking Easier
These tools make baking simpler but aren’t essential:
- Offset spatula: Spreads cream cheese evenly to prevent lumps
- Stand mixer: Reduces hand-mixer strain when blending batter
- Strawberry huller: Quickly removes stems for fresh toppings
Measuring Tips for Perfect Results
Getting the measurements right is crucial. Here’s how to do it:
| Ingredient Type | Method |
|---|---|
| Dry ingredients | Scoop and level with a knife |
| Liquid ingredients | Check at eye level with a clear cup |
| Cheese ingredients | Weigh with a digital scale for precision |
Too much flour can mess up the strawberry earthquake cake’s texture. Always check your tools against these guidelines for the best results.
Step-by-Step Guide to Making Strawberry Earthquake Cake with White Cake Mix
Learn to make this layered cake by following these steps. Each step is important to get the “earthquake” pattern and the creamy strawberry cheesecake with cake mix taste.
Preparing Your Ingredients
Begin by softening butter, eggs, and cream cheese. This makes mixing easier. Wash and chop strawberries. Have all your tools and ingredients ready to make the process smoother.

Mixing the Cake Base
- Whisk the white cake mix dry ingredients until they’re well combined.
- Add oil, milk, and eggs slowly, mixing just until it’s moist. Too much mixing can make it dense.
- Include ½ cup strawberry puree for flavor and color.
Creating the Cream Cheese Layer
In another bowl, mix softened cream cheese with powdered sugar until it’s smooth. Add ¼ cup strawberry jam to get the strawberry cheesecake with cake mix feel. Don’t overbeat to keep it spreadable.
Proper Assembly Technique
Pour one-third of the cake batter into a greased pan. Spread the cream cheese mixture in swirls with a knife. Then, add the rest of the batter and fold in the strawberries gently. Bake at 325°F for 45-50 minutes.
Pro Tip: Swirl gently to preserve the “earthquake” marbling effect without overmixing layers.
Let it cool completely before cutting. The success of strawberry earthquake cake with white cake mix depends on careful layering. Patience during assembly is key for both looks and taste.
Baking Tips for the Perfect “Seismic” Effect
To get the cracked look of a strawberry earthquake cake, you need to be precise. First, heat your oven to 350°F. This helps the cake cook evenly and crack naturally. Place the cake pan in the middle rack to bake the top and bottom layers without burning.
- Layer strategically: Spread the cream cheese mixture unevenly over the baked cake base to encourage shifting during baking.
- Don’t overmix: A slightly undercooked center allows the strawberry seismic cake to “settle” as it cools, forming cracks.
- Let it rest: Avoid removing the cake immediately after baking. Cooling slowly prevents collapse of the seismic layers.
A pro tip from Sarah Lee, a pastry chef in *Food Network Magazine*, is to be patient and uneven. Here’s how to get it right:
| Aspect | Optimal Setting | Why It Matters |
|---|---|---|
| Oven Temperature | 350°F | Prevents overbaking while encouraging cracks |
| Cream Cheese Layer Thickness | 1/4-inch peaks | Creates uneven expansion during baking |
| Baking Time | 35–40 minutes | Allows gradual setting of layers |
Look for signs: A well-baked strawberry earthquake cake will have visible ridges and a sunken center. These cracks are not mistakes. They show your cake has the real seismic texture.
Delicious Variations of Strawberry Earthquake Cake
Want to make your strawberry earthquake cake your own? Try these changes to suit your taste. You can also explore what to make with strawberry cake mix for something new. Whether you love berries or chocolate, there’s something for you.
Fresh vs. Frozen Strawberry Options
| Option | Pros | Cons | Tips |
|---|---|---|---|
| Fresh Strawberries | Peak flavor, vibrant color | May add excess moisture | Drain and pat dry before layering |
| Frozen Strawberries | Available year-round, no prep needed | Can dilute flavor slightly | Use thawed, unsweetened berries for best results |
Adding Complementary Flavors
Try these flavors to enhance your cake:
- Lemon Zest: 1 tsp finely grated to brighten sweetness
- Almond Extract: ½ tsp for a nutty twist
- White Chocolate: Melt ½ cup and swirl into the cream cheese layer
Making It More Decadent
Make your cake even richer with:
- Streusel Topping: Mix ¼ cup flour, ¼ cup sugar, 2 tbsp butter until crumbly. Sprinkle over layers.
- Chocolate Chips: Fold ½ cup semisweet chips into the cake batter.
- Caramel Glaze: Combine ½ cup caramel sauce with 1 tbsp milk; drizzle over cooled cake.
Troubleshooting Common Strawberry Earthquake Cake Problems
Baking the perfect strawberry earthquake cake with white cake mix needs careful attention. Issues like soggy layers or uneven sweetness can occur. But, they can be fixed. Here’s how:
Preventing a Soggy Bottom
Strawberries can make the base moist. Try these steps:
- Pat berries dry with paper towels before layering.
- Line the pan with a thin layer of crushed graham crackers or shortbread to absorb moisture.
- Bake the bottom layer fully before adding fillings to ensure it’s sturdy.
Fixing Texture Issues
Is your cream cheese runny or your cake dense? Adjust your methods:
- Ensure cream cheese is at room temperature before mixing to avoid separation.
- If the cake feels dense, use a boxed white cake mix as instructed—overmixing can compact the batter.
- Let layers cool completely before assembling to prevent sogginess.
Adjusting Sweetness Levels
Strawberries’ sweetness changes with the season. Taste and adjust:
- Reduce added sugar by 1-2 tablespoons if berries are ripe and sweet.
- For a white cake mix base, check its sweetness first—some mixes are pre-sugared.
- Add lemon zest to balance overly sweet layers without adding more sugar.
Even small changes can make your strawberry earthquake cake a hit. Focus on texture and moisture to keep your layers stable and flavors balanced.
Serving Suggestions and Storage Tips
Let your strawberry earthquake cake sit at room temperature for 30 minutes before cutting. This makes the strawberry cheesecake with cake mix layers creamy and easy to slice. For a casual event, serve it in individual portions with whipped cream.
To make it look fancy, place fresh strawberries around the base or drizzle with melted white chocolate.
- Storage: Wrap tightly in parchment paper and foil. Keep refrigerated up to 3 days for best texture.
- Freezing: Seal in an airtight container for up to 2 months. Thaw overnight in the fridge before serving.
- Toppings: Add a sprinkle of powdered sugar or a fresh mint leaf for visual appeal.

“The key to showcasing this dessert’s layers is a clean, minimalist plating style,” says pastry chef Emily Torres. “Let the cake’s contrast speak for itself.”
Pair it with a light citrus sorbet or a drizzle of balsamic glaze to adjust sweetness. Don’t leave the cake uncovered—it dries out faster than regular cakes. For parties, slice servings 1–2 hours before serving to prevent crumbling.
Always store leftovers in the coldest part of your fridge. This keeps the strawberry earthquake cake’s texture soft and creamy.
What to Pair with Your Strawberry Seismic Cake
Make your strawberry seismic cake even better with the right pairings. Whether it’s a big celebration or a cozy dessert night, these choices will make the cake’s flavors pop.
Beverage Pairings
Find drinks that either match or contrast the cake’s richness:
| Beverage | Flavor Notes | Pairing Reason |
|---|---|---|
| Espresso | Bitter, bold | Cuts through sweetness and highlights the cake’s fruitiness. |
| Sparkling Lemonade | Crisp, citrusy | Freshness contrasts with creamy layers. |
| Moscato D’Asti | Sweet, floral | Matches the cake’s fruity notes and light texture. |
Complementary Desserts
Add desserts that won’t overshadow the cake’s main flavors:
- Vanilla wafer cookies – Crisp texture and mild flavor let the cake shine.
- Dark chocolate-dipped strawberries – Bitter chocolate contrasts with the cake’s sweetness.
- Coconut macarons – Light, airy meringue offers a textural break.
Serving for Special Occasions
For birthdays or bridal showers, try these ideas:
- Display the cake on a tiered stand with complementary desserts nearby.
- Serve mini strawberry seismic cake slices on decorative plates for tasting tables.
- Pair with what to make with strawberry cake mix like mini cupcakes for a cohesive theme.
Conclusion: Why Your Strawberry Earthquake Cake Will Be the Star of Any Gathering
The strawberry earthquake cake is a hit at any event. Its bold layers and vibrant flavors stand out. The design, inspired by earthquakes, combines creamy cheese with sweet strawberries.
It’s easy to make, whether you use fresh or frozen berries. This lets you add your own special touch. The recipe is simple, but the results are amazing.
Getting the right measurements and assembling it correctly is key. This ensures the cake has the perfect mix of tangy, sweet, and light textures. Even beginners can make it look and taste like a pro.
This cake is perfect for any occasion, from birthdays to summer parties. It’s a favorite among guests, no matter the time of year.
Feel free to try different toppings or pair it with drinks. The cake’s unique look and taste will leave a lasting impression. With this recipe, you can make any event unforgettable. Your guests will be talking about it for a long time.
FAQ
What is a strawberry earthquake cake?
A strawberry earthquake cake is a sweet treat. It has a white cake base and cream cheese, filled with strawberries. The cake looks like it has cracks, just like after an earthquake.
Can I use strawberries from a cake mix for this recipe?
Yes, you can use strawberry cake mix for the base. But, mixing white cake mix with fresh or frozen strawberries makes it taste better.
Why is it called an earthquake cake?
The cake gets its name from how it looks when baked. The cream cheese layer sinks, making cracks. It looks like an earthquake happened.
What kitchen tools do I need for making a strawberry earthquake cake?
You’ll need a 9×13 inch baking dish and mixing bowls. An electric mixer and measuring cups are also essential. An offset spatula and strawberry huller can be helpful too.
How do I get the best “seismic” effect in my cake?
To get the best look, keep an eye on your oven’s temperature. Make sure it’s evenly heated. Look for cracks on the surface to know it’s done right.
What variations can I make to my strawberry earthquake cake?
You can make it your own by using fresh or frozen strawberries. Try adding lemon zest or almond extract. Top it with streusel or chocolate chips for extra flavor.
How can I troubleshoot common issues with my cake?
For a soggy bottom or texture problems, pat the strawberries dry. Adjust the baking time and make sure the cream cheese is right. Measuring ingredients correctly is key.
What are some serving suggestions for a strawberry seismic cake?
The cake is great warm or chilled. Try it with whipped cream, powdered sugar, or fresh strawberries. These add to its taste and look.
What drinks pair well with strawberry earthquake cake?
Good drinks to pair it with are coffee, dessert wines, and strawberry lemonade. Each one brings out the cake’s flavors, making it even more enjoyable.
How should I store leftovers of the strawberry earthquake cake?
Keep leftovers in the fridge for up to three days. If you want to keep it longer, freeze it. Thaw it before serving.